How Leak Detection Actually Works: The Methods Explained
Acoustic, thermal, tracer gas, moisture mapping and pressure testing each find a different kind of leak. Here is what every method is genuinely good and bad at, why one tool on its own misses so much, and how a real survey moves from a damp patch to a marked repair point.
When a ceiling starts to stain or a floor never quite dries, most people picture someone lifting boards until the pipe appears. Modern leak detection is the opposite of that. The whole point is to find the exact source before anyone breaks into the fabric of the building, so the repair is a small, deliberate opening rather than an exploratory demolition.
The catch is that no single instrument can find every leak. Water behaves differently under a solid concrete floor than it does inside a timber-framed wall, and a hairline split in a copper pipe sounds nothing like a weep from a plastic push-fit joint. That is why serious leak detection in London relies on a small toolkit of complementary methods, each covering the blind spots of the others. This guide explains what each method actually does, where it shines, where it fails, and how they combine into a survey that ends with a repair point marked on the wall or floor.
Why one method is never enough
Every detection method reads a symptom, not the leak itself. Acoustic equipment listens for the sound water makes as it escapes. Thermal cameras read surface temperature. Tracer gas follows the path of least resistance to the surface. Moisture tools measure how wet a material is. Pressure testing tells you whether a circuit holds water at all. None of them puts an eye on the pipe.
Because each reads a different symptom, each can be fooled. A cold patch on a thermal image might be a draught, not a leak. A high moisture reading might be residual damp from an old problem that has already been fixed. A quiet acoustic trace might mean there is no leak, or it might mean the pipe is plastic and simply does not transmit sound well. Cross-confirming with two or three methods is how a professional turns a plausible guess into a confident, single point. When acoustic, thermal and a moisture map all agree on the same spot, you can open the floor there and be right.
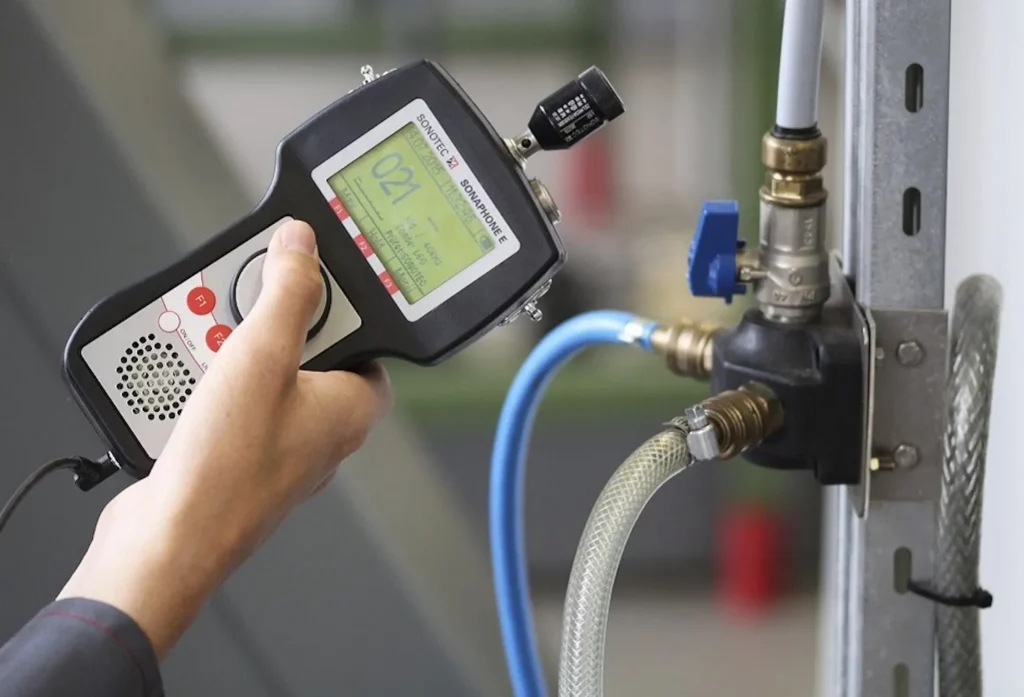
Acoustic leak detection
Acoustic detection is the workhorse of pressurised pipe work. When water escapes a pipe that is under mains pressure, it makes noise: a hiss as it forces through the split, and a drumming or rushing sound as it hits the surrounding material. Ground microphones and electronic amplifiers let a technician hear that sound through concrete, screed and tile, and by comparing the loudness at different points, walk it back to where it is strongest, directly above the leak.
It is superb on metal. Copper and steel carry sound cleanly, so a leak on a buried copper central-heating pipe or a metal mains supply can often be pinned to within a few centimetres. It works through solid floors, which is exactly where you least want to dig blind. You can read more about how we use it in acoustic leak detection across London.
Where acoustic struggles
Plastic is the great weakness. Modern plumbing uses a lot of PEX, polybutylene and MDPE, and plastic absorbs and deadens sound rather than carrying it. A leak on a plastic pipe can be almost silent a metre away, so acoustic alone will regularly miss it or place it wrongly. Very slow weeps make little noise at all, and a noisy environment such as a busy road, a running boiler or traffic overhead can drown the trace. This is precisely why acoustic is a starting point, not a verdict, and why an operator who only carries a microphone is poorly equipped for a plastic-plumbed home.
Thermal imaging
A thermal camera does not see water. It sees temperature. Escaping water changes the surface temperature of whatever it soaks: a hot-water or heating leak warms the floor above it, while a cold mains leak or the evaporative cooling from spreading damp can create a distinctly cool zone. On the screen this shows as a plume or a track that often follows the run of the pipe or the path the water is taking beneath the surface.
Thermal imaging is fast and completely non-invasive, which makes it ideal for scanning a large area quickly, for tracing underfloor heating circuits, and for mapping how far water has already travelled. It is one of the best tools for spotting the difference between the leak source and the much larger stain the water has created. Our approach is set out under thermal imaging leak detection in London.
Where thermal struggles
It reads the surface, so a leak under thick concrete, deep screed or heavy insulation may not produce a temperature difference the camera can see. It struggles with cold-water leaks that are close to room temperature, because there is little contrast to detect. And it is easily misread by the untrained: underfloor heating pipes, hot-water runs, sunlight through a window and warm appliances all produce thermal patterns that look like leaks but are not. Thermal points you at an area of interest. It rarely gives the final centimetre on its own.
Tracer gas
Tracer gas is the method that finds what everything else misses. A safe, inert mixture, typically hydrogen and nitrogen, is introduced into the pipe or system after it has been drained. Being the smallest molecule there is, hydrogen escapes through the tiniest crack and rises to the surface, where a sensitive gas detector picks it up. Wherever the gas is emerging is where the leak is.
This is the answer to the plastic-pipe problem. Because it does not rely on sound or temperature, tracer gas works just as well on silent plastic joints as on metal. It excels on very small or slow leaks, on pipes buried under solid floors, and on situations where acoustic and thermal have both come back inconclusive. It is also decisive on central-heating circuits and can be applied to a single isolated section to confirm a suspicion. See tracer gas leak detection in London for detail.
Where tracer gas has limits
It needs access to the pipe so the gas can be introduced, and the system usually has to be drained down first, so it takes longer to set up than simply waving a camera over a floor. On a large or complex system it is normally used surgically, on the circuit already narrowed down by other methods, rather than being the first thing tried. It is powerful and precise, but it is most efficient as the confirming method after the search has been focused.
Moisture mapping
Moisture meters and mapping tools measure how much water is present in a material. A capacitance or resistance meter, a hygrometer and a thermo-hygrometer together let a technician chart the extent of damp across a wall or floor, find where it is wettest, and track the moisture back towards its source, because a leak is generally wettest closest to where the water is coming from.
Moisture mapping is invaluable for understanding the shape and scale of a problem, for distinguishing an active leak from historic damp that has dried, and for confirming after a repair that a wall is genuinely drying out. It is quick, entirely non-destructive and safe to use anywhere.
The honest limit of a moisture meter
A moisture meter measures wetness. It does not find leaks. It tells you a wall is damp, which you very often already knew from the stain, but it will not tell you which pipe, joint or fitting is responsible, and water tracks along joists and under screed so the wettest reading can be well away from the actual source. Treating a moisture reading as a diagnosis is the single most common mistake in this trade, and it is one that customers pay for repeatedly. Moisture mapping is a genuinely useful part of a survey. It is not, on its own, leak detection.
Pressure testing
Pressure testing answers a blunt, essential question: does this pipe or circuit actually hold water. A section of pipe work is isolated, brought up to a set pressure with water or air, and watched. If the pressure holds, that circuit is sound. If it falls, there is a leak on it, and the rate of drop hints at how large.
Done properly, per circuit rather than on the whole system at once, pressure testing is how you narrow a whole house down to the one run that is failing. Instead of chasing symptoms across every room, you confirm which heating loop, hot-water leg or cold feed is losing water and concentrate the acoustic, thermal and tracer-gas work there. It also provides the clean proof at the end of a job that a repair has actually held.
What pressure testing does not do
It tells you a circuit leaks. It does not tell you where along that circuit the leak is. A dropping pressure test confirms the problem is real and localises it to one run, and then the pinpointing methods take over. Used alone it is a diagnostic gate, not a locator, which is exactly why it belongs alongside the other methods rather than in place of them.
The methods at a glance
| Method | Best for | Main limitation |
|---|---|---|
| Acoustic | Metal pipes under pressure, leaks under solid floors, mains and heating pipes | Poor on plastic pipe; masked by background noise and very slow weeps |
| Thermal imaging | Fast area scanning, underfloor heating, hot-water leaks, mapping spread | Reads surface only; weak on cold leaks and anything under deep screed |
| Tracer gas | Plastic pipes, tiny or slow leaks, buried pipes, confirming a suspected point | Needs pipe access and usually a drain-down; slower to set up |
| Moisture mapping | Measuring extent of damp, separating active from historic, verifying drying | Finds wetness, not the leak source; wettest point can mislead |
| Pressure testing | Proving whether a circuit leaks; isolating the failing run per circuit | Confirms a leak exists but not its exact location |
What the forums keep warning about
Spend any time reading through DIY and home-improvement communities such as r/DIYUK or the DIYnot forums and the same complaints surface again and again. They are worth taking seriously, because they describe how leak detection goes wrong in the real world.
- The twenty-minute damp-meter visit. The most repeated grievance is the operator who arrives, runs a moisture meter over the wall, announces that it is damp and leaves, having charged a call-out fee for confirming what the homeowner already knew. As covered above, a moisture meter measures wetness, not leaks. Mistaking one for the other is the complaint pattern that comes up most, and it is entirely avoidable.
- Single-method operators missing plastic-pipe leaks. A recurring theme is the technician who only carries acoustic gear, finds nothing on a modern plastic-plumbed house, and declares there is no leak while the ceiling keeps staining. The leak was real; the method could not hear it. Homes plumbed in plastic need a method that does not depend on sound.
- Why acoustic goes quiet on plastic. People are often puzzled that expensive listening kit finds nothing. The consistent, correct explanation is that plastic dampens the sound of escaping water, so acoustic alone is unreliable on PEX, polybutylene and MDPE. It is not that the equipment is faulty; it is that it is the wrong single tool for that pipe.
The honest lesson from all of it is the same as the engineering: one method, used alone, misses too much. The homeowners who report good outcomes are almost always the ones whose surveyor used several techniques and cross-checked them.
How we run a survey
Our answer to all of the above is not to pick a favourite tool, but to carry all of them and use them together on every visit. Acoustic listening, thermal imaging, tracer gas, moisture mapping and per-circuit pressure testing all come as standard. The whole survey is non-invasive: nothing is cut open until the source is confirmed. It is booked at a fixed fee agreed before we arrive, so there are no surprises, and it is offered on a no find, no fee basis, so the risk of a fruitless visit sits with us rather than with you.
A typical survey moves through clear stages:
- Symptom and history. We start with what you have seen, when it appears, and how the plumbing is laid out, which already narrows the likely culprits.
- Isolate and pressure test. We isolate circuits and pressure test them one at a time to confirm the leak is real and to identify the single run that is failing.
- Scan the area. A thermal sweep and a moisture map show how far the water has spread and where it is wettest, focusing attention on the right zone.
- Pinpoint. Acoustic listening walks the failing metal run back to its loudest point; on plastic or where the trace is inconclusive, tracer gas takes over and finds the exact exit point.
- Cross-confirm and mark. Only when two or three methods agree on the same spot do we mark it. That mark is the small, precise opening for the repair, not a hopeful guess.
The result is a survey that ends where the guesswork usually begins: with a clear point on the wall or floor, backed by more than one method, ready for a targeted repair.
Frequently asked questions
Can you find a leak without lifting the floor or breaking into walls?
Yes. The entire survey is designed to be non-invasive. We use acoustic listening, thermal imaging, tracer gas, moisture mapping and pressure testing to locate the source through the surface, so nothing is cut open until the exact point is confirmed. When the floor or wall is finally opened, it is a small, deliberate access hole at the marked spot rather than exploratory digging across the room.
Why do you use several methods instead of just one?
Each method reads a different symptom and each has blind spots. Acoustic struggles on plastic pipe, thermal only reads the surface, and a moisture meter finds wetness rather than the leak itself. Using two or three together lets us cross-confirm: when acoustic, thermal and a moisture map all agree on the same spot, the result is a reliable single point rather than a guess that risks opening the wrong place.
My pipes are plastic. Can you still find the leak?
Yes, and this is exactly where single-method operators fall short. Plastic pipe deadens sound, so acoustic detection alone is unreliable on PEX, polybutylene and MDPE. Tracer gas does not depend on sound at all; the gas escapes through the smallest crack and is detected at the surface, so it finds leaks on plastic just as well as on metal. We carry it as standard on every visit.
Isn't a moisture meter reading enough to find the leak?
No. A moisture meter measures how wet a material is, not where the water is coming from. It confirms damp, which you can usually already see, but water tracks along joists and under screed, so the wettest reading is often away from the actual source. Moisture mapping is a useful part of a survey for judging extent and confirming drying, but on its own it is not leak detection.
What does no find, no fee actually mean?
It means the risk of a fruitless visit sits with us. The survey is booked at a fixed fee agreed before we arrive, so you know the cost up front with no hourly surprises. If we cannot locate the leak, you are not charged the detection fee. It is a straightforward way of making sure our incentive is to find the source, not simply to attend.
How long does a leak detection survey take?
Most domestic surveys are completed within a single visit of a few hours, though it varies with the size of the property and how well hidden the leak is. Straightforward cases where the symptom points clearly to one circuit are quicker; a slow leak under a solid floor that needs pressure testing followed by tracer gas takes longer. Because we work to a fixed fee, extra time spent confirming the point does not change your price.