How Much Does Ceiling Water Damage Cost to Repair? A London Cost Breakdown
Ceiling water damage repair is rarely a single bill. It is a chain of jobs, from stopping the leak to replastering and repainting. Here is how the costs break down stage by stage, what drives them, and where insurance can help.
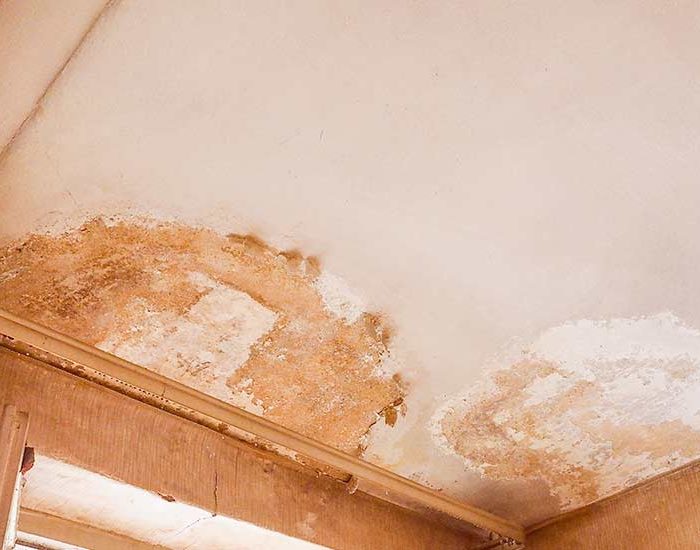
A brown ring on the ceiling, a soft bulge in the plaster, or a slow drip through a light fitting: ceiling water damage tends to arrive quietly and then demand attention all at once. The first question almost everyone asks is a fair one. How much is this going to cost to put right? The honest answer is that there is no single figure, because ceiling water damage is not one job. It is a chain of jobs, and the size of each link depends on how much water got in, how long it sat there, what your ceiling is made from, and whether the leak is still running when the repairs begin.
This guide breaks the work down stage by stage, from stopping the leak through to the final coat of paint. We use typical UK trade cost-guide ranges throughout, so you can build a realistic picture before you speak to anyone. We will also explain why the order of the work matters, how your buildings insurance may cover part of it through a clause called trace and access, and why chasing the cheapest patch-up first often ends up being the most expensive route of all.
Why ceiling water damage is never one price
When people search for a ceiling repair cost, they are usually picturing the cosmetic finish: the plaster and the paint. That is the visible damage, so it is understandable. But by the time a ceiling is stained or bulging, water has already travelled somewhere it should not, and the staining is a symptom rather than the problem. If you repair the ceiling without dealing with the source, the stain comes back, and now you have paid twice.
So the sensible way to think about cost is as a sequence of stages, each with its own price band:
- Finding the leak (detection)
- Fixing the leak at source (the plumbing or roofing repair)
- Drying the structure out properly
- Removing and replacing damaged plasterboard or lath-and-plaster
- Replastering or skimming
- Redecorating and repainting
- Any electrical work where water has reached wiring or fittings
Not every job needs every stage. A small, freshly caught leak from a bathroom above might need only detection, a repair, a few days of drying and a repaint. A ceiling that has been quietly soaking for months and finally sagged will likely need the full run. The table further down gives typical ranges for each stage so you can add up the pieces that apply to your situation.
Stage one: stopping the leak (detection and repair)
Before anyone talks about plaster, the water has to stop. That means locating the source, which is not always where the stain is. Water runs along joists, pipes and the underside of floorboards before it drops, so the wet patch on your ceiling can sit a metre or more from the actual leak. This is where guesswork gets expensive: pulling down a ceiling to "have a look" is a large, dirty job, and if the leak is somewhere else you have destroyed a good ceiling for nothing.
Professional leak detection uses non-invasive equipment such as thermal imaging, acoustic listening gear, moisture meters and tracer gas to pinpoint the source without ripping the room apart. On this site we charge a fixed detection fee, so you know that cost before we arrive, and the actual repair is quoted separately once we know what we are dealing with. You can see how that works on our pricing page, and there is more detail on the process itself on our leak detection in London page.
The repair cost at source varies enormously because the source varies. A weeping compression fitting or a failed radiator valve is a quick, low-cost fix. A cracked soil pipe buried in a wall, a failed shower tray seal, or a slipped roof tile letting rain in are bigger pieces of work. As a rough guide, a straightforward accessible plumbing repair sits at the lower end of trade cost-guide ranges, while anything involving lifting flooring, opening walls, or roof access climbs from there. The key point is that detection tells you which of these you are facing before you commit to a repair budget, rather than after.
Stage two: drying out
This is the stage people most often skip, and it is the one that quietly ruins the more expensive stages that follow. Plaster, timber joists, floorboards and insulation all hold water. If you replaster over a ceiling that is still damp, you trap moisture behind a fresh finish, which leads to blown plaster, peeling paint, a lingering musty smell and, given time, mould. The drying has to happen before the rebuilding, and it has to be verified with a moisture meter rather than assumed.
For a small area, drying can be as simple as good ventilation and patience over a week or two, which costs nothing but time. For anything significant, professional drying with dehumidifiers and air movers is the reliable route. Trade cost-guide ranges for hired drying equipment are typically quoted per day or per week, and the total depends on how saturated the structure is and how many units are needed. A single room might dry in several days; a ceiling that has soaked joists and insulation can take a good deal longer. It is worth building this time into your expectations, because rushing it is how a one-time repair becomes an annual one.
Stage three: repairing or replacing the ceiling
Now the physical damage. What this costs depends heavily on two things: the type of ceiling, and how far the damage has gone.
Plasterboard ceilings
Most ceilings in homes built or refurbished in recent decades are plasterboard, screwed or nailed to the joists and then skimmed with a thin plaster finish. Plasterboard is relatively quick to work with. If water has stained but not structurally weakened it, sometimes the board can be dried, sealed with a stain-blocking primer and reskimmed. If it has swelled, sagged or the paper face has delaminated, the affected boards come down and new ones go up. Replacing a section of plasterboard is a moderate job; replacing a whole ceiling is naturally more.
Lath-and-plaster ceilings
Older London properties, particularly Victorian and Edwardian homes, often have lath-and-plaster ceilings: thin wooden strips (laths) with plaster pushed through and keyed behind them. These are more labour-intensive to repair and to match. Water damage can cause the plaster to lose its key and pull away from the laths, which weakens a much larger area than the visible stain suggests. Repairs to lath-and-plaster tend to sit at the higher end of trade cost-guide ranges because of the care and time involved, and because a sympathetic repair in a period property is skilled work. In some cases the practical decision is to take the old ceiling down and replace it with plasterboard, which changes the cost profile again.
Did it collapse?
A ceiling that has partially or fully collapsed is a different scale of job. Beyond the cost of a full replacement, there is debris removal, protection of the room and its contents, and inspection of the joists above for water damage. A collapse is also a safety matter: a saturated ceiling can come down without much warning, so if yours is bulging or sagging, keep out from underneath it and get it looked at promptly. If you are watching a stain grow and wondering how worried to be, our guide on what to do about a damp patch on the ceiling walks through the warning signs.
Stage four: replastering and skimming
Once new board is up, or an old surface has been made good, it needs a plaster finish to be ready for decoration. Skimming a ceiling is a specialist skill, and a plasterer will usually price by the room or by the area. Trade cost-guide ranges for skimming a ceiling depend on the size of the room, the height of the ceiling (higher ceilings mean more access equipment and time) and the condition of the surface underneath. A small bathroom ceiling is at the modest end; a large through-lounge with a tall ceiling is a bigger day rate and more materials.
It is worth noting that plaster needs to dry and cure before painting, which adds days to the overall timeline even though it does not add much to the labour cost. Patience again pays off here: painting fresh plaster too soon causes patchy, peeling results.
Stage five: repainting and redecorating
The final visible stage. Even a small water stain usually needs more than a quick coat, because water marks bleed through ordinary emulsion. A stain-blocking primer or sealer goes on first, then the finish coats. For a full ceiling replacement or reskim, the whole ceiling is painted rather than spot-treated, so the finish is even.
Redecoration costs sit at the more predictable end of the whole job. Trade cost-guide ranges are typically quoted by the room or by the day, and they scale with area, ceiling height and whether walls and cornicing also need attention where water has run down. If the damage reached decorative coving or a ceiling rose in a period room, matching and restoring those adds skilled time.
Stage six: electrics
This is the stage no one wants and everyone should take seriously. Water and electricity in the same ceiling void is a genuine hazard. If water has tracked into a light fitting, a downlight, a junction box or along cabling, the affected circuits should be isolated and inspected by a qualified electrician before anything is switched back on. Do not test a light that has had water near it by flicking the switch.
Electrical costs here range from a simple inspection and the replacement of a single fitting at the lower end, up to rewiring a run of damaged cable and replacing multiple fittings at the higher end. Where water has entered a consumer unit or caused tripping, the work and the cost grow accordingly. It is not an area to economise on, and a certificate from the electrician is useful evidence for an insurance claim.
Typical cost ranges by stage
The table below sets out the stages and where each typically sits within UK trade cost-guide ranges. Treat these as a framework for building your own estimate, not a quote. Every property, and every leak, is different, which is exactly why we quote repairs individually rather than off a price list.
| Repair stage | What it covers | Typical UK trade cost-guide range |
|---|---|---|
| Leak detection | Non-invasive pinpointing of the source | Fixed detection fee (agreed before the visit) |
| Leak repair at source | Plumbing or roofing fix, quoted after detection | Low for accessible fittings, rising sharply where floors, walls or roof access are involved |
| Drying out | Dehumidifiers and air movers, verified with a moisture meter | Priced per day or per week; longer for saturated joists and insulation |
| Plasterboard repair or replacement | New board where water has swelled or delaminated the old | Moderate for a section, higher for a full ceiling |
| Lath-and-plaster repair | Period-property repair or full replacement | Upper end, due to labour and matching |
| Replastering / skimming | Finishing the surface ready for paint | Priced by room or area; higher for tall or large ceilings |
| Repainting / redecorating | Stain-blocking primer plus finish coats | Predictable, scales with area and height |
| Electrical works | Isolation, inspection, fittings and any rewiring | Low for a single fitting, higher for damaged cable runs or consumer unit issues |
What actually drives the cost up or down
Reading the stages above, a few consistent factors decide whether a ceiling repair is a modest bill or a major one:
- How much water, and for how long. A leak caught in a day is a fraction of the cost of one that soaked for months. Early detection is the single biggest cost saver.
- The size of the affected area. Every stage scales with square metres.
- The ceiling type. Plasterboard is quicker and cheaper to work with than lath-and-plaster.
- Whether it collapsed. A collapse adds debris removal, joist inspection and a full rebuild.
- Access. High ceilings, awkward stairwells and occupied rooms all add time.
- Whether electrics or period features are involved. Both add skilled, non-negotiable work.
Why fixing the source first is not optional
It is tempting, especially with a small stain, to skip straight to the paint. Cover it up, move on. The problem is that a stain is water telling you where it has been, not where it is coming from. Redecorate over a live leak and the water simply reappears, usually within weeks, having done more damage in the meantime. You then pay for the redecoration again, on top of the detection and repair you avoided the first time.
The forums back this up. Browse threads on communities like r/DIYUK or the MoneySavingExpert boards and the recurring advice from people who have been through it is consistent: find and fix the leak before you touch the cosmetics, dry the structure properly, and do not let a decorator skim over damp plaster. The general consensus is that the households who spend the most are usually the ones who patched the symptom two or three times before finally paying to sort the cause. That is the false economy this whole guide is written to help you avoid.
How trace and access insurance can help
Here is the part that can genuinely reduce your out-of-pocket cost. Many home buildings insurance policies include a clause known as trace and access. It is designed to cover the cost of finding a leak and getting to it, including the work of lifting floors or opening ceilings to reach the source, and often the making-good afterwards. The resulting water damage to the ceiling itself may also be covered under the escape of water section of a standard policy, subject to your terms and excess.
The catch is evidence. Insurers want a clear, documented account of where the leak was, how it was found and what was done. This is where professional detection earns its keep twice over: it avoids unnecessary destruction, and it produces the insurer-ready report that supports a claim. We provide reports written with claims in mind. There is more on how this works, and on which policies typically include the cover, on our trace and access in London page. Always check your own policy wording and speak to your insurer before work begins, because excesses and exclusions vary.
How we price it, honestly
Our position is deliberately simple. Detection is a fixed fee, agreed before we arrive, so there are no surprises on the part that matters most. The repairs, whatever they turn out to be, are quoted separately once we know exactly what we are dealing with, because pretending to price a repair before finding the leak would be guesswork. We do not operate a no find, no fee model: our detection is a proper diagnostic service with equipment and expertise behind it, and it is priced as one. What you get for that fee is a clear answer and, where relevant, a report your insurer can work with.
If you are staring at a stain right now, the most useful next step is not to reach for the filler. It is to find out where the water is actually coming from, because that single piece of information decides everything that follows and, more often than not, decides how much the whole thing costs.
Frequently asked questions
Can I just paint over a water stain on my ceiling?
Only once the leak is fixed and the ceiling is fully dry. A stain is a sign of where water has travelled, so painting over a live or recent leak will let the mark bleed back through and the water damage will continue behind the fresh finish. When you do paint, use a stain-blocking primer first, otherwise ordinary emulsion will not hold back the mark. If the leak has not been traced and stopped, painting is money spent twice.
How long does a ceiling need to dry before it can be repaired?
It depends on how saturated the structure is. A lightly affected area might dry with good ventilation over a week or two. A ceiling with soaked joists, boards and insulation can take considerably longer, often with dehumidifiers and air movers running. The important thing is that drying is confirmed with a moisture meter rather than assumed. Replastering or painting over damp plaster traps moisture and leads to blown plaster, peeling paint and mould, so this stage should never be rushed.
Will my insurance cover ceiling water damage?
Often, at least in part. Many buildings policies include a trace and access clause that covers finding the leak and getting to it, and the resulting water damage may fall under the escape of water section, subject to your excess and policy terms. Insurers want clear evidence of where the leak was and how it was found, which is why a professional detection report helps a claim. Always check your own wording and contact your insurer before work starts, as cover and excesses vary between policies.
Why is a lath-and-plaster ceiling more expensive to repair than plasterboard?
Lath-and-plaster is the older construction found in many period London homes: thin wooden laths with plaster keyed behind them. It is more labour-intensive to repair, and water damage often loosens the plaster's key over a wider area than the visible stain suggests. Repairs need care and skill to match the existing finish, which places them at the higher end of trade cost-guide ranges. In some cases replacing the old ceiling with plasterboard is the more practical choice, which changes the cost picture.
My ceiling is bulging. Is it about to collapse?
A bulge or sag means water is pooling above and the ceiling is holding weight it was not designed to hold. It can come down with little warning, so keep out from underneath, move anything valuable, and get it inspected promptly. A collapse is a larger and more costly job than a stain, because it adds debris removal, inspection of the joists above and a full rebuild. Acting before it falls is safer and usually cheaper.
Do you charge to find the leak, and is it no find no fee?
We charge a fixed detection fee, agreed before we arrive, so you know that cost up front. It is not a no find, no fee arrangement, because detection is a genuine diagnostic service using thermal imaging, acoustic equipment and moisture meters, and it is priced as one. The fee buys you a clear answer about where the water is coming from and, where relevant, an insurer-ready report. Any repair work is then quoted separately once we know exactly what the fix involves.